
This post contains affiliate links.
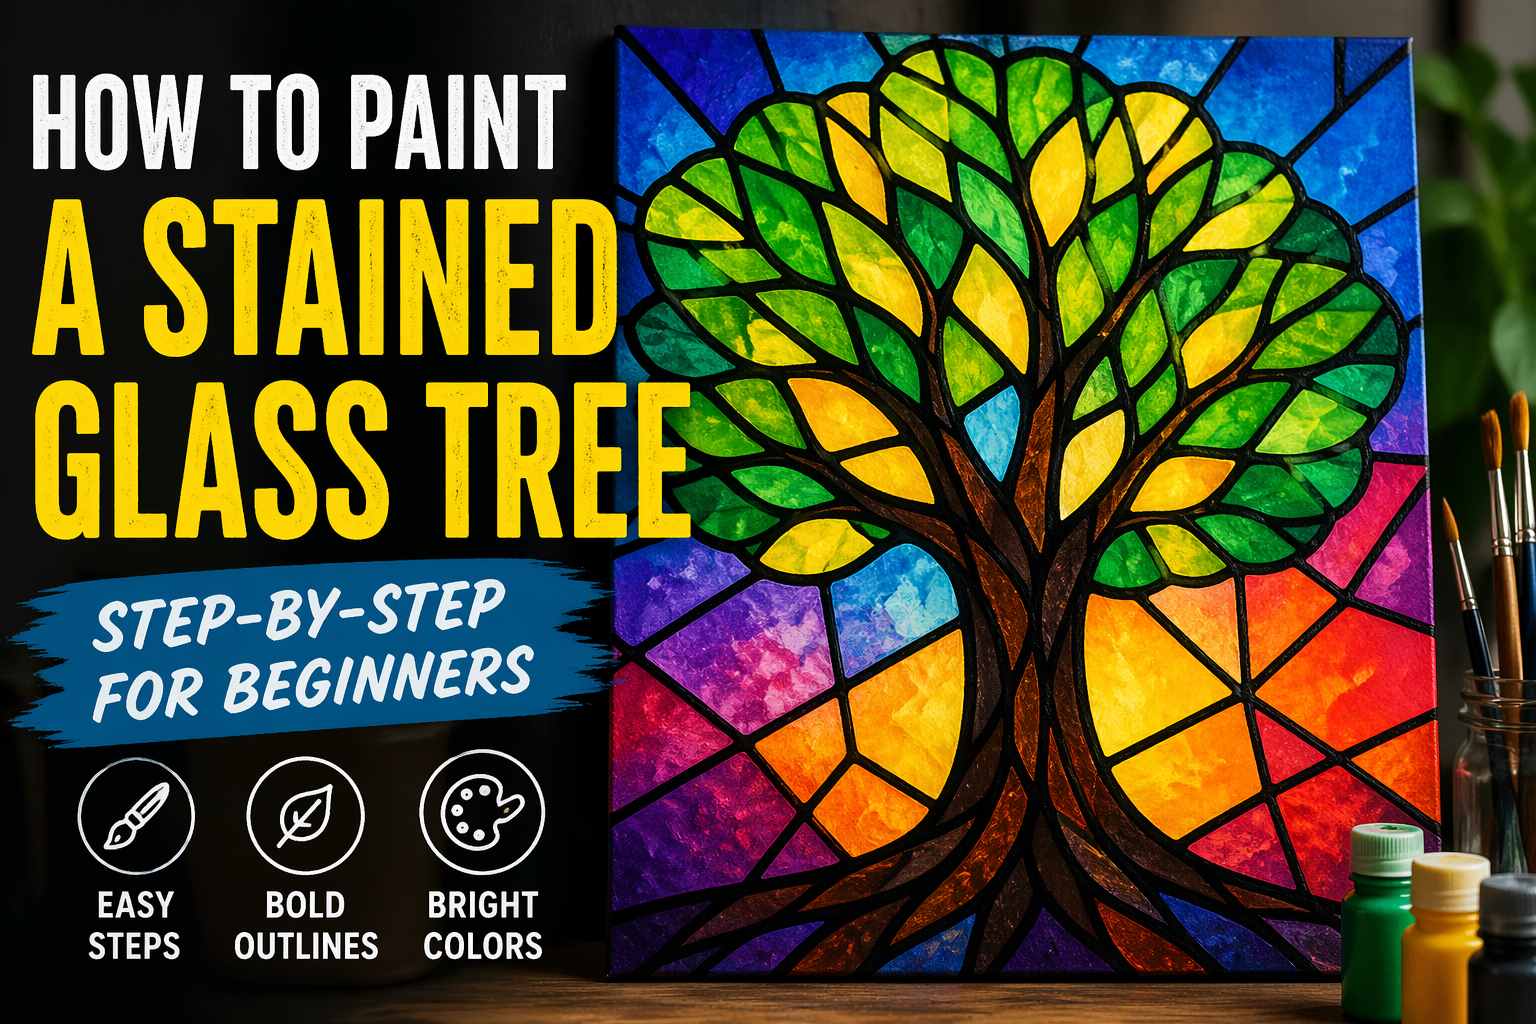
In this step-by-step tutorial, you’ll learn how to paint a stained glass tree using acrylic paint on a black canvas. This beginner-friendly technique uses bold outlines and blended color to create a glowing stained glass effect.
It combines:
- Bold outlines
- Bright color
- Simple shapes
👉 And you don’t need advanced drawing skills.
This step-by-step method keeps it easy and clean so you can focus on painting—not struggling with the drawing.
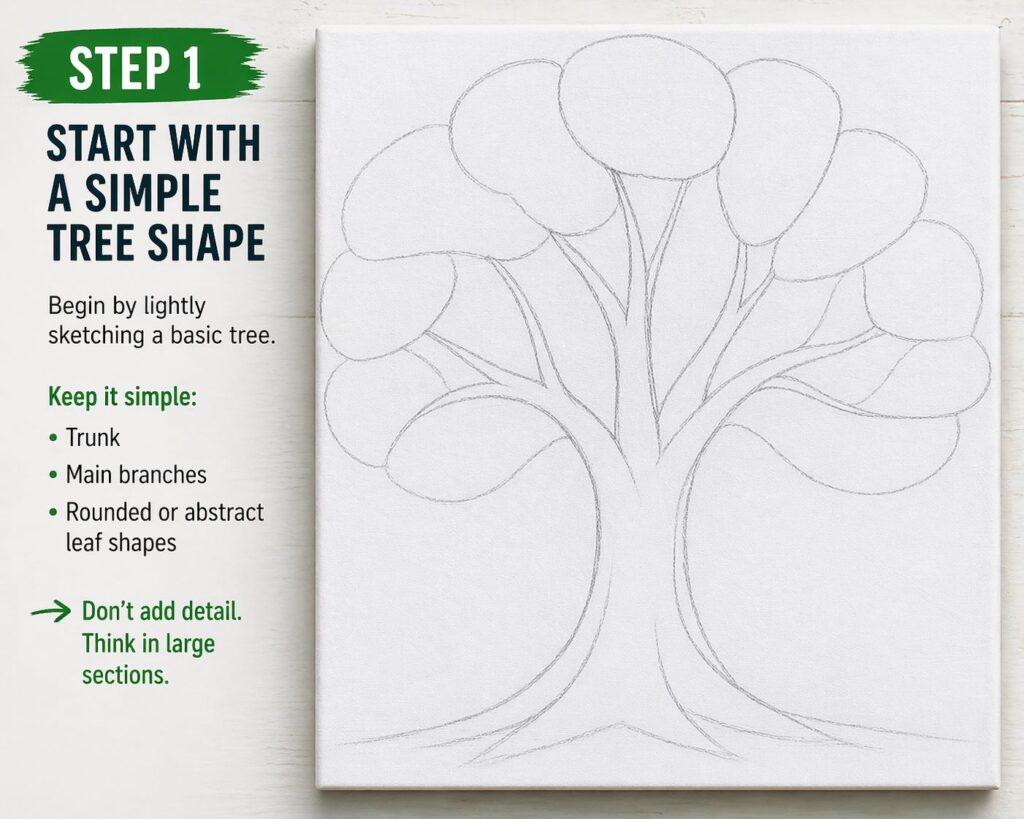
🧱 Step 1: Start with a Simple Tree Shape
Begin with a white canvas, which will keep your colors bright and clean as you build your stained glass effect.
Using a pencil or a light chalk pencil, gently sketch a simple tree shape onto the canvas. Start with the trunk, then loosely map out the main branches and the overall shape of the canopy. Keep everything light—this is just a guide, not a detailed drawing.
At this stage, focus on placement and balance, not perfection. Make sure your tree fills the space in a way that feels natural and centered on the canvas.
Next, begin thinking in terms of large, simple shapes rather than detailed leaves. You can lightly suggest a few section lines within the tree—these will later become your stained glass “panels.”
👉 Keeping the sketch simple on a white canvas makes it easier to build clean color sections and strong outlines in the next steps.
Keep it simple:
- Trunk
- Main branches
- Rounded or abstract leaf shapes
👉 Don’t add detail. Think in large sections.
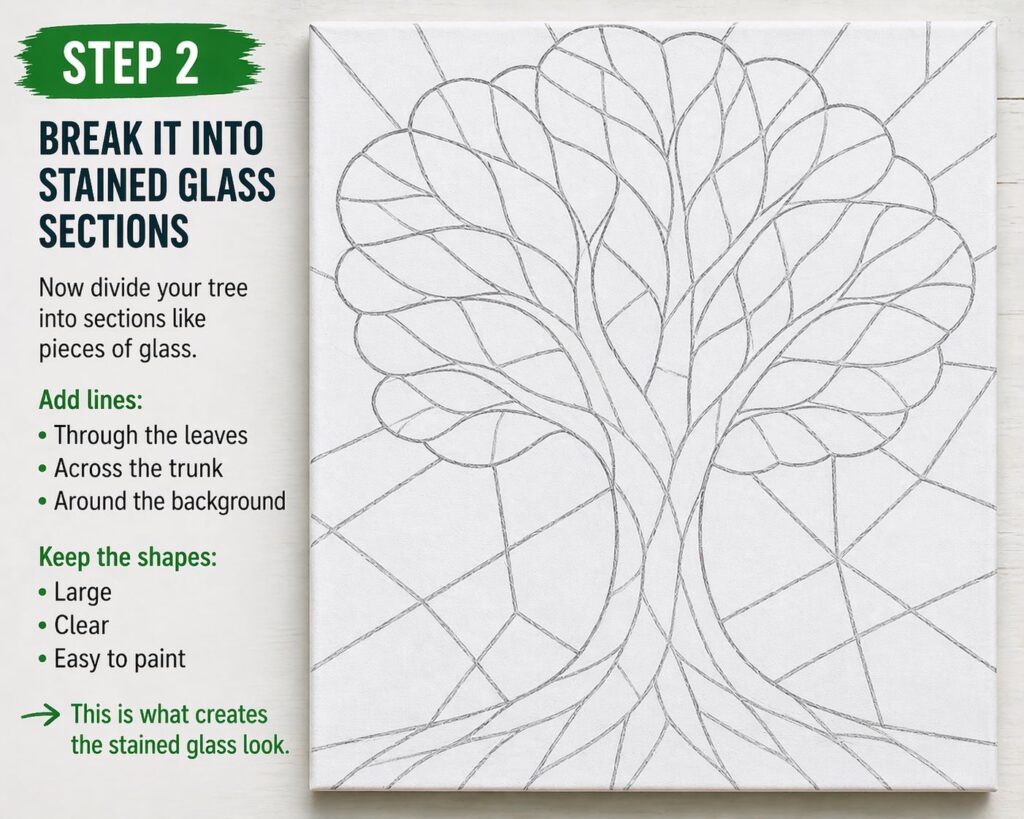
✂️ Step 2: Break It Into Stained Glass Sections
Break It Into Stained Glass Sections
Lightly divide the tree into simple, bold shapes, similar to individual pieces of stained glass. These sections will help guide your color placement and make it easier to create clean outlines and a glowing effect later on.
Add lines:
- Through the leaves
- Across the trunk
- Around the background
Keep the shapes:
- Large
- Clear
- Easy to paint
👉 This is what creates the stained glass look.
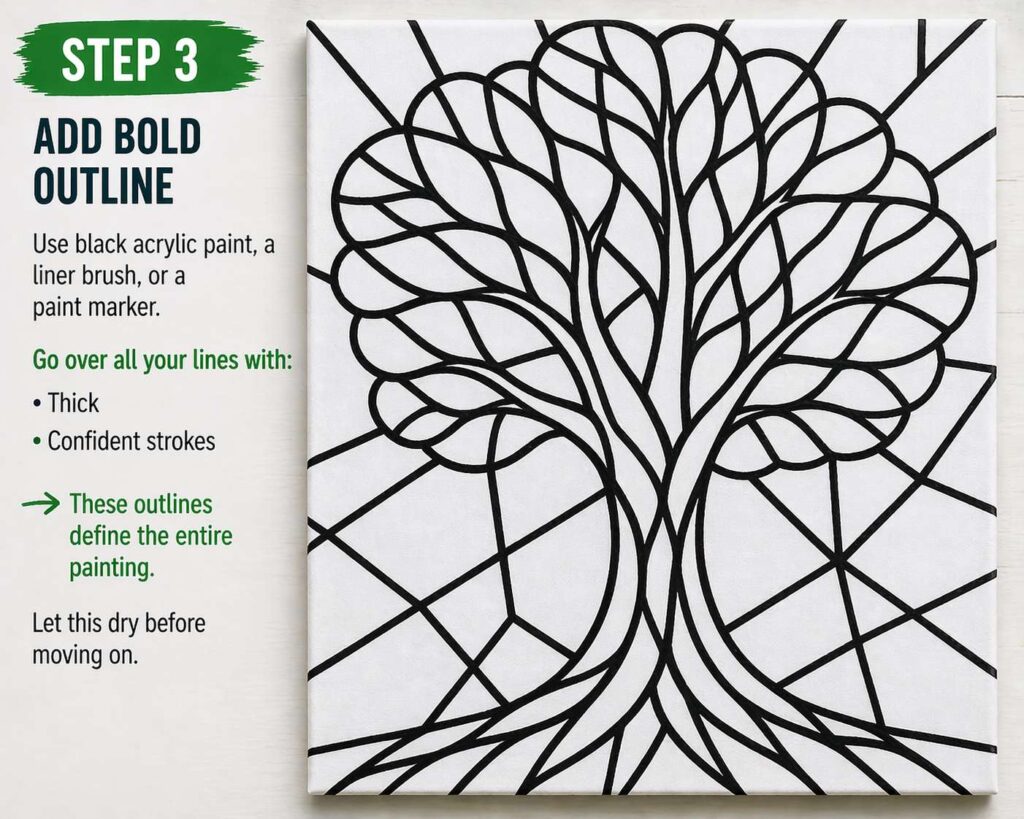
🖤 Step 3: Add Bold Outline
Add Bold Outline
Use black acrylic paint with a liner brush or a paint marker to trace over your section lines. These bold outlines separate each shape and mimic the lead lines found in real stained glass, helping your colors stand out and giving the painting its signature look.
Go over all your lines with:
- Thick
- Confident strokes
👉 These outlines define the entire painting.
Let this dry before moving on.
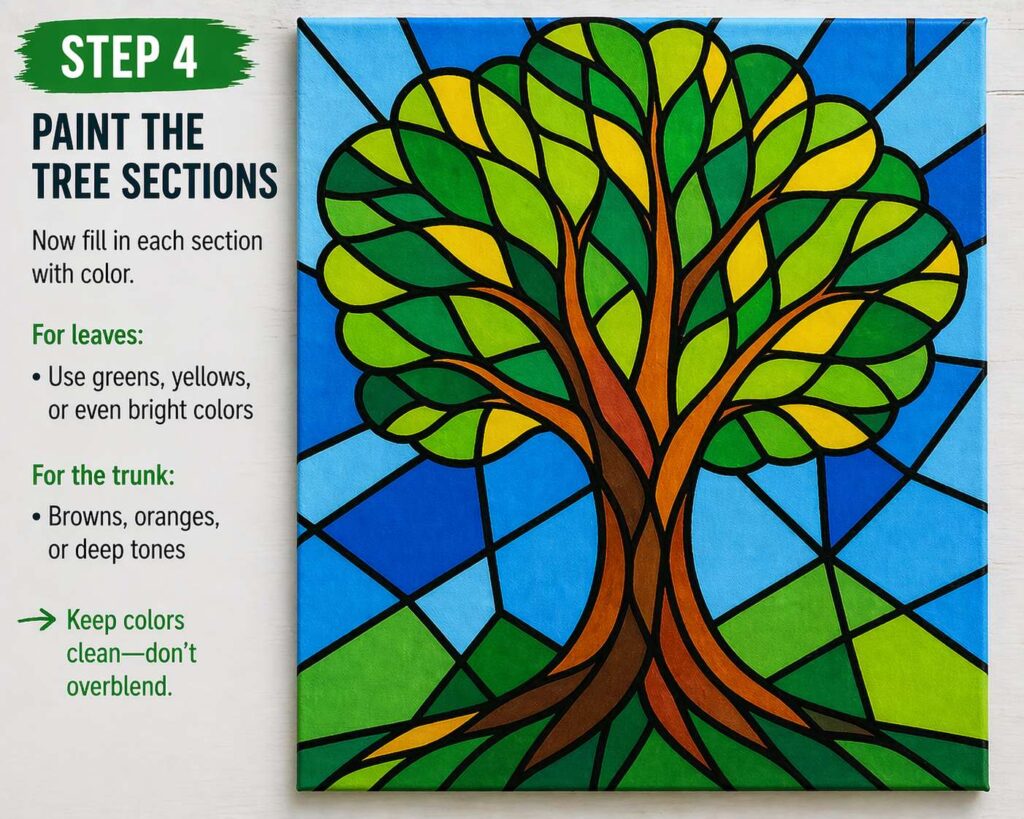
🌈 Step 4: Paint the Tree Sections
Paint the Tree Sections
Fill each section with acrylic color, working one area at a time. Keep your edges clean along the outlines—this separation is what gives the painting its stained glass look and helps each color stand out clearly.
For leaves:
- Use greens, yellows, or even bright colors
For the trunk:
- Browns, oranges, or deep tones
👉 Keep colors clean—don’t overblend.
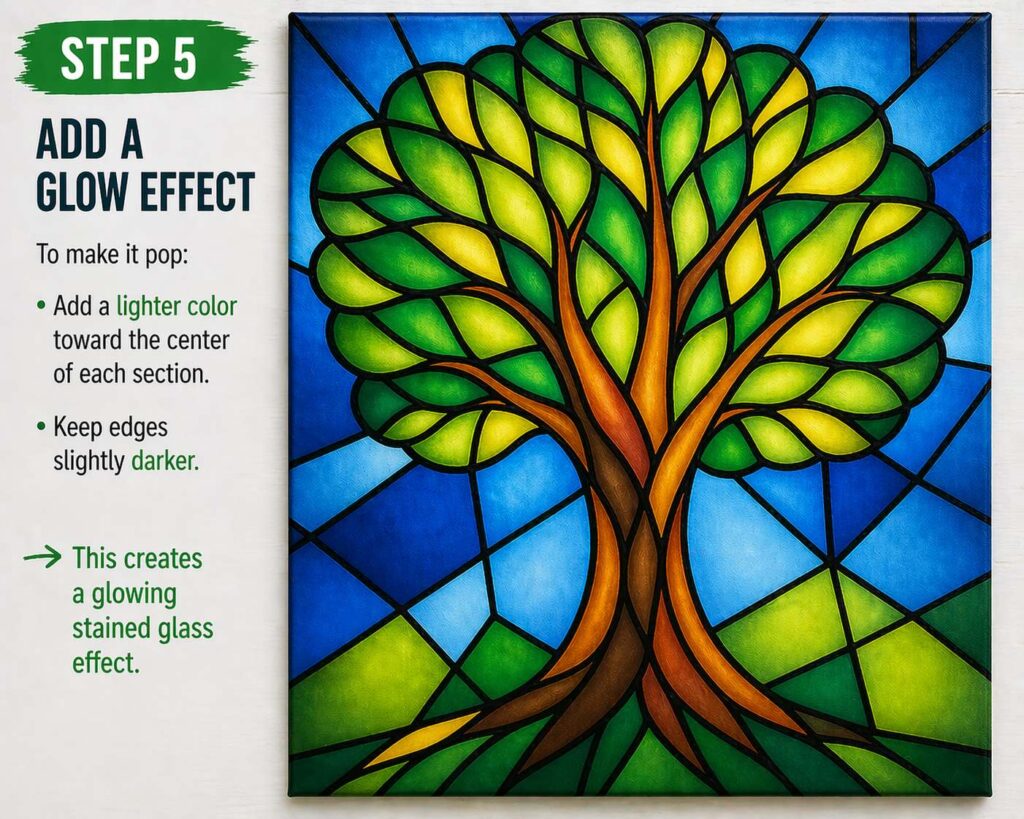
💡 Step 5: Add a Glow Effect
To make the colors stand out, apply a lighter tone toward the center of each section and keep the edges slightly darker. This creates a glowing effect that mimics how light passes through stained glass, giving your painting more depth and vibrancy.
- Add a lighter color toward the center of each section
- Keep edges slightly darker
👉 This creates a glowing stained glass effect.
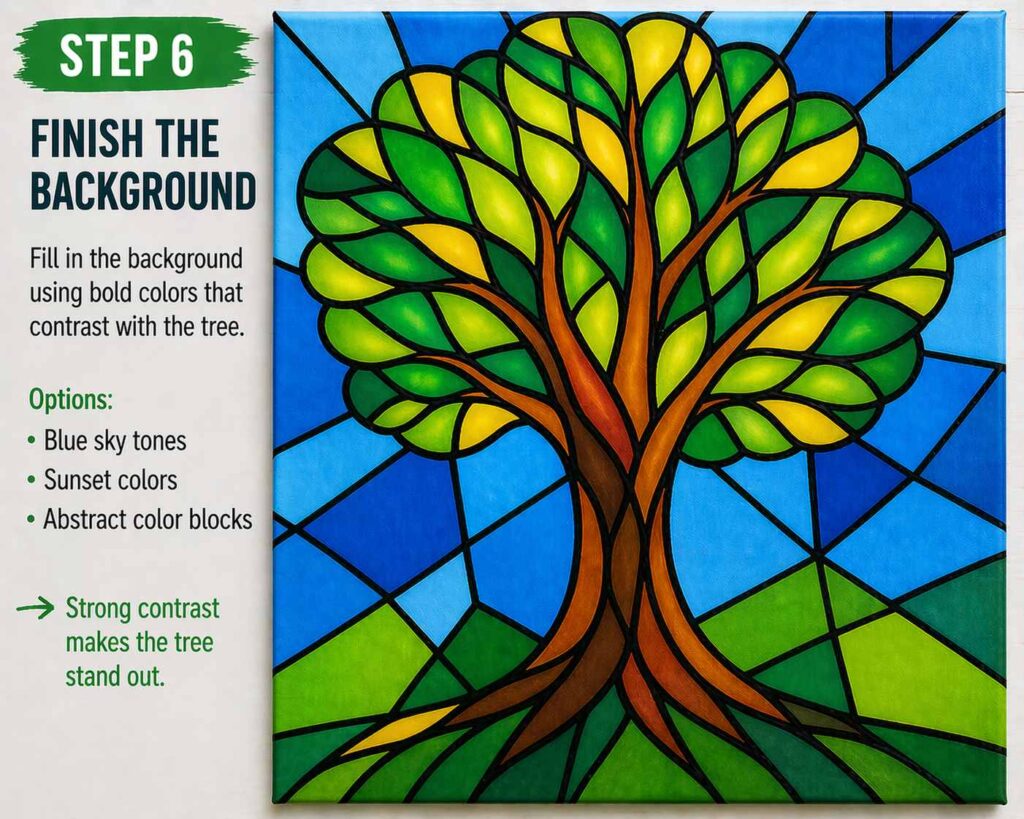
🎯 Step 6: Finish the Background
Finish the Background
Fill in the background with bold, contrasting colors to make the tree stand out. Strong contrast helps separate the subject from the background and enhances the overall stained glass effect.
Options:
- Blue sky tones
- Sunset colors
- Abstract color blocks
👉 Strong contrast makes the tree stand out.
⚠️ Common Mistakes to Avoid
- Making shapes too small – Small sections are harder to paint cleanly and can make the design feel cluttered.
- Using thin outlines – Bold lines are key to the stained glass look; thin lines won’t create enough separation.
- Overblending colors – Too much blending can make colors look muddy and take away from the crisp, glass-like effect.
- Adding too much detail – Keep it simple. Too many details can distract from the strong shapes and bold design.
👉 Remember: Simple, bold shapes and clean lines will always create a stronger stained glass effect.
🎨 Final Thoughts
A stained glass tree is one of the easiest ways to create a bold, eye-catching painting.
Once you understand:
- Shape
- Line
- Color
👉 You can apply this style to anything.
🎯 Want to Paint Faster Without Drawing?
If drawing slows you down, this method helps:
👉 https://guywann.xyz/how-i-started-painting-faster-without-getting-stuck-on-the-drawing/
🔗 Related Articles
- How to Simplify a Photo for Acrylic Painting
- How to Paint Clean Lines with Acrylic
- Stained Glass Acrylic Painting Techniques
❓ FAQs
Is this good for beginners?
Yes, this is one of the easiest stained glass style projects to start with.
Do I need to draw well?
No—just focus on simple shapes.
What colors work best?
Bright, high-contrast colors work best for this style.
💡 Explore More on Artist Corner
YOUTUBE: https://www.youtube.com/@ArtistCorner-
This post contains affiliate links.